Do you find yourself getting weary of editing the shadows on each layer of your scrapbook page? Or have you ever worked hard to get one element styled just the way you want it and wish there were an easier way to repeat the style on another element? There is! It’s just hidden a bit. I had been scrapbooking for a few years before I learned this.
However, despite being hidden, it’s easy to do and you’ll find it useful so often. I use this technique in every layout.
Let’s start with simple shadowing of the papers in this layout I’m working on, using Trixie Scraps’ new kit New Year New Me. I’m using Photoshop Elements 9.
1. I applied a shadow to my first paper. I selected the paper layer in the layers palette. Then I navigated to the Shadows in the Effects Panel. To find the shadows, make sure you have selected the Layer Styles icon (circled in red in the screenshot below) at the top of the Effects Panel. Then you can access Drop Shadows in the drop down menu. As you can see, I’ve selected the Low Shadow as my starting point. With my paper layer selected, I double click on the Low Shadow style.
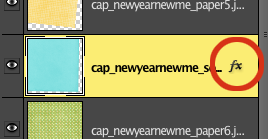
2. Next I edit the shadow. The default shadows are rarely good for digi-scrapping. To edit layer styles, double click on the fx that follows the layer name in the Layers palette, circled in the screen shot below. In older versions of PSE, instead of fx, there is a starburst icon.
When you double click on the fx, you will get the Styles Settings dialogue box, where you can edit not only shadow, but also lighting angle, glow, bevel, and stroke. This is how you customize your layer styles. Shadowing is a big topic, for other tutorials, but basically the closer the object is to the background, the lower the shadow. For paper I often make the size and distance both 9 px and I like to reduce the opacity to 65%. In the screen shot, you can see the paper to which I’m applying the shadow.
3. Now here’s the new technique I wanted to share. instead of repeating the above process for all the other papers, I’m going to copy the layer style of the first paper and apply it all at once to the other paper layers. To do this, I right-click on the first paper layer in the Layers palette. In the pop out menu I click on Copy Layer Style.
Then I select all the other paper layers in my layout, including the paper strips with which I framed my photo and the journaling paper. To select multiple layers of the Layers palette, hold down the Control/Command key while clicking on them. Then, as before, I right-clicked on one of the layers and chose Paste Layer Style from the pop-out menu.
Here’s my finished layout, with shadows added in groups of similar types of items.
I hope you find this as useful as I have. It’s not just for shadowing either. Sometimes I apply bevels or other layer styles to objects, such as alphas, and then copy and paste the style to another element on my page. Sometimes I even do this if the elements will just have slightly different shadow styles, because it’s easier to edit slightly than start from the default shadow.

All Trixie Scraps Designs products can be found in the following online stores:
Trixie Scraps Shop * My Memories * Gotta Pixel * Scrapbook Bytes * Funky Playground


