Happy Tuesday Trixie Scraps Fans! Jamie B. here with what I am certain will be a handy new technique for you! Have you ever purchased a kit that you just love, only it’s missing what you might think is a key element to give your layout that little bit of extra oomph! Or, maybe it has just the right element, but you really wished it was in a different color. Well, I am here to show you a very simple way to re-color that element!
In the layout below, I used a Trixie Scraps kit called Showers of Love. I squealed with delight about the gorgeous flower elements in this kit, but to complete my layout, I was looking to use the perfect foliage piece from another of Trixie’s kits, one of my favorites called Best Guy Ever. It has the exact foilage element I was looking for, except the color wasn’t quite right for this layout. I simply needed to re-color the leaves to a shade that would complement the other colors in the Showers of Love kit.
Here’s how to do this: First, open up an element that has the color you are looking for, then select the eyedropper tool and click on a spot on the element to grab that color. You should see this show up in your foreground color.

Next, you’ll want to open up your leaf element. You need to select the entire image, simply go to the right side of your screen where you see your layers and CTRL+Click on the layer thumbnail. You should now see what looks like marching ants around the entire image.

Next, click on the new fill or adjustment layer (the small half white/half black circle at the bottom of your layers).

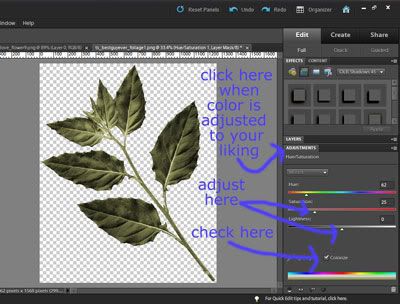
A new selection box opens up, select hue/saturation, then the adjustment layer opens up. You’ll see at the bottom the option to select “colorize”. Check that box. You’ll see your image color change slightly. Next you’ll use the sliders to adjust the saturation and lightness until you get the desired color.

Next, click where you see the word adjustments to close that out and you’ll see your layers again. You’ll need to “clip” or merge down that adjustment layer you just did before you’ll be able to drag your newly re-colored element into your layout. You can right-click on the adjustment layer in your layers pallet and a menu will pop up that will allow you to select merge down.

If you think you might use this adjusted color again, save your newly re-colored image (but be sure to change the name so you don’t save over your original)!

There you have it! It may have seemed like a lot of steps, but once you get the hang of it I’m sure you’ll be re-coloring all the time! If you are inspired to try out this technique, please load you layout in the Trixie Scraps Gallery so we can leave you some love! Plus, by creating a layout using Trixie Scraps products, and uploading it to Trixie’s Gallery, your layout will be included in our weekly Show Off slide show, and you’ll get a prize! It’s that simple!
I hope you learned something new today and thanks for stopping by!

All Trixie Scraps Designs products can be found in the following online stores:
Trixie Scraps Shop * My Memories * Gotta Pixel * Scrapbook Bytes * PickleBerryPop


Thank you for your tutorial. I’ve shared it with http://www.facebook.com/howtoscraponmac